House heating cost have recently increased sharply, and the transition to non-fossil energy sources is simultaneously promoted. New houses are often equipped through city heating or heat pumps. Existing houses, however, are originally heated using fossil fuels such as natural gas or oil. As electricity is anticipated to be of increasing importance in the future towards sustainable energy use (see e.g. this Dutch report), the low-cost transition to electric heating of existing houses has become increasingly important. I have therefore looked for an alternative way to heat our house since heat pumps are hard to get by and often expensive in new and used form due to its increased popularity. Therefore, I have decided to try to upcycle a heat pump from a second hand split unit airconditioning or AC (the inverter type, which can both heat and cool). Below, you can read a short report about that process.
Installation of floor heating
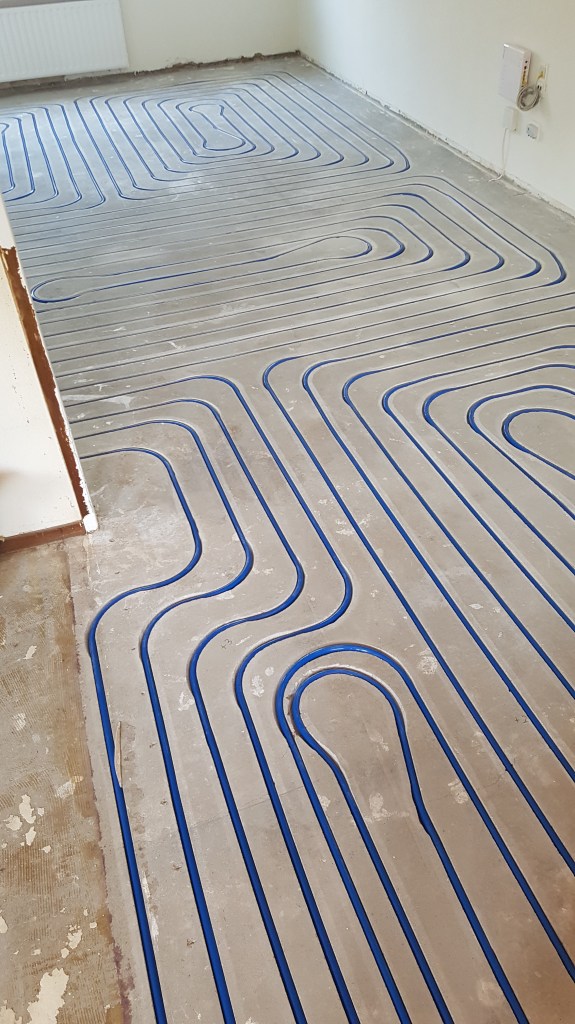
We have recently milled floor heating pipes into our floor. This type of heating is ideal for low temperature heating (30-35 degrees), such as heat pumps can provide.
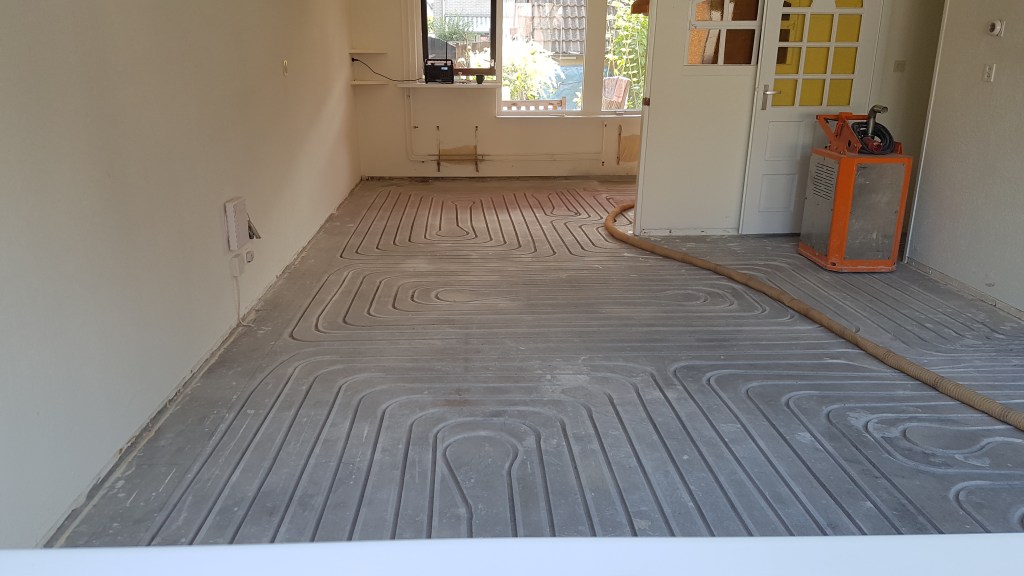
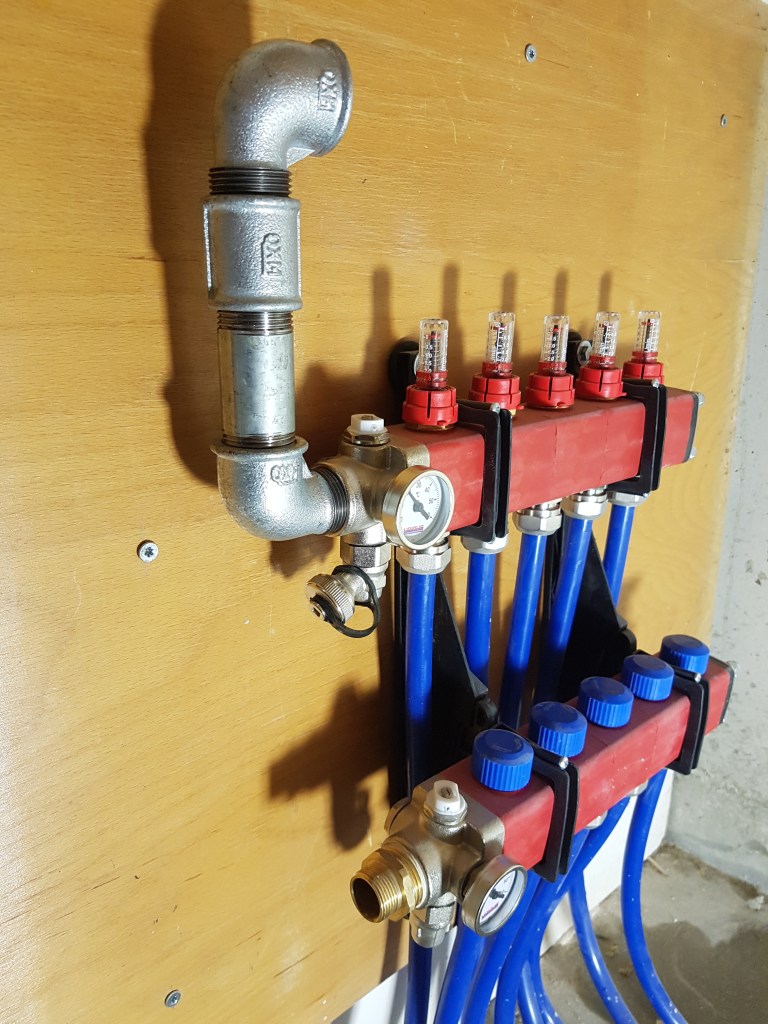
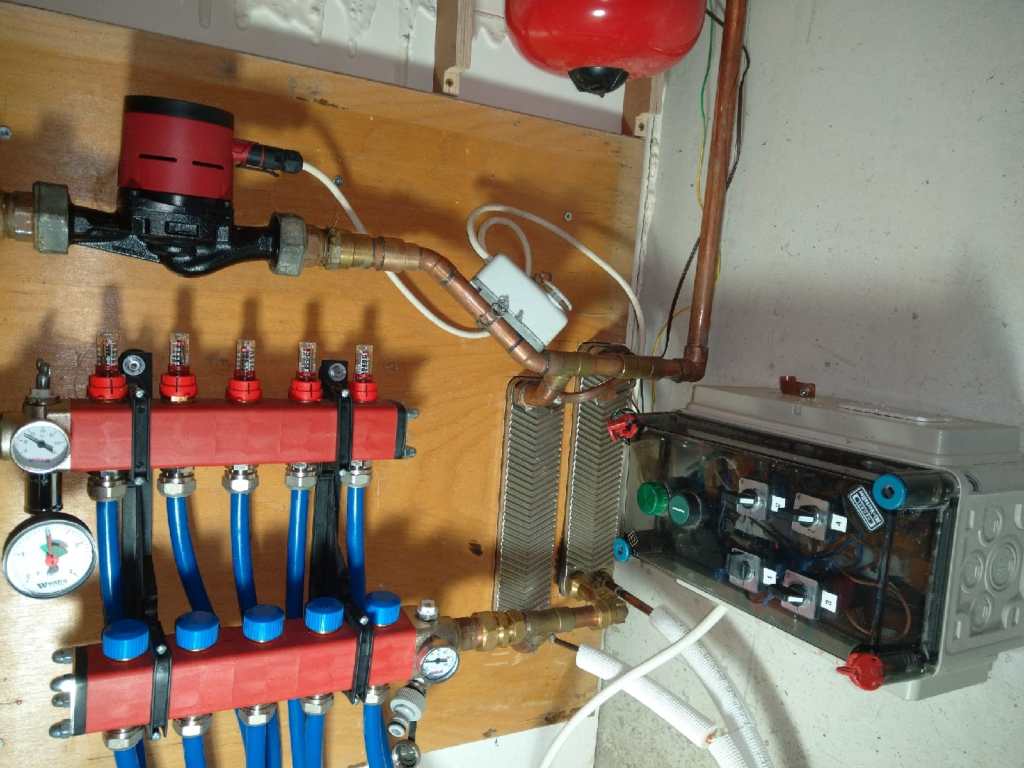
For floor heating in combination with a heat pump it is recommended to use many groups (maximum length of 70 meters per group). In my case that lead to 5 groups (about 35 m2 of area). Be aware that the manifolds should ideally be of large flow type, without a pump in between. I have used a plastic manifold (called ‘composite’), with a 1-inch connector to allow for a large flow. I have used 16 mm outer diameter floor tubing.
Converting the AC indoor unit
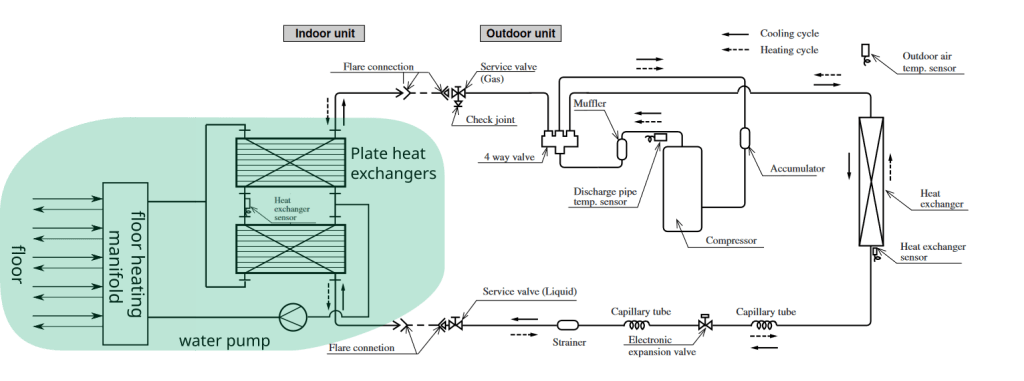
Technically, The difference between an airconditioner and a heat pump is minimal. Both of them use a compression-expansion cycle with a phase-changing refrigerant. The Coefficient Of Performance (COP) of both are also comparable. The biggest difference is that the heat exchanger at the indoor unit is delivering/removing heat from the ambient air, whereas the heat exchanger in a heat pump exchanges it to a water line. Additionally, some outdoor units of heat pumps are connected to a well or ground water heat exchanger, rather than exchanging with the ambient air.
So, the main difference being the heat exchanger, I have scavenged all electronics from the indoor unit (in my case a Mitsubischi SRC25ZG-S ). The PCB in the indoor unit is the central control board and communicates to the user and outdoor unit. I could reuse both the thermistors (one for indoors, one on the heat exchanger). I realised afterwards that the fan motor is required to be mounted on the PCB, if not connected, the software will recognise its absence and will stop operation after half a minute.
Then, I have installed a ‘plate exchanger’, which was originally used in an old natural gas central heating unit. I chose to connect it to the refrigerant tubing using silver soldering, as I felt more confident that it would result in a leak-tight and strong connection. Make sure that you solder with at least 15 percent of silver in the tin (I have used this one), to stand the 30-40 bar of pressure when loaded with refrigerant. Also, be sure to use a shielding gas (nitrogen or noble gas), to prevent oxidation of the inside of the tube. The oxidation will end up in the refrigerant stream and might cause damage to the compressor and/or decrease the heat pump’s performance. In total, the two plate exchangers consisted of about 30 plates. As an example, these plate heat exchangers could work as well.
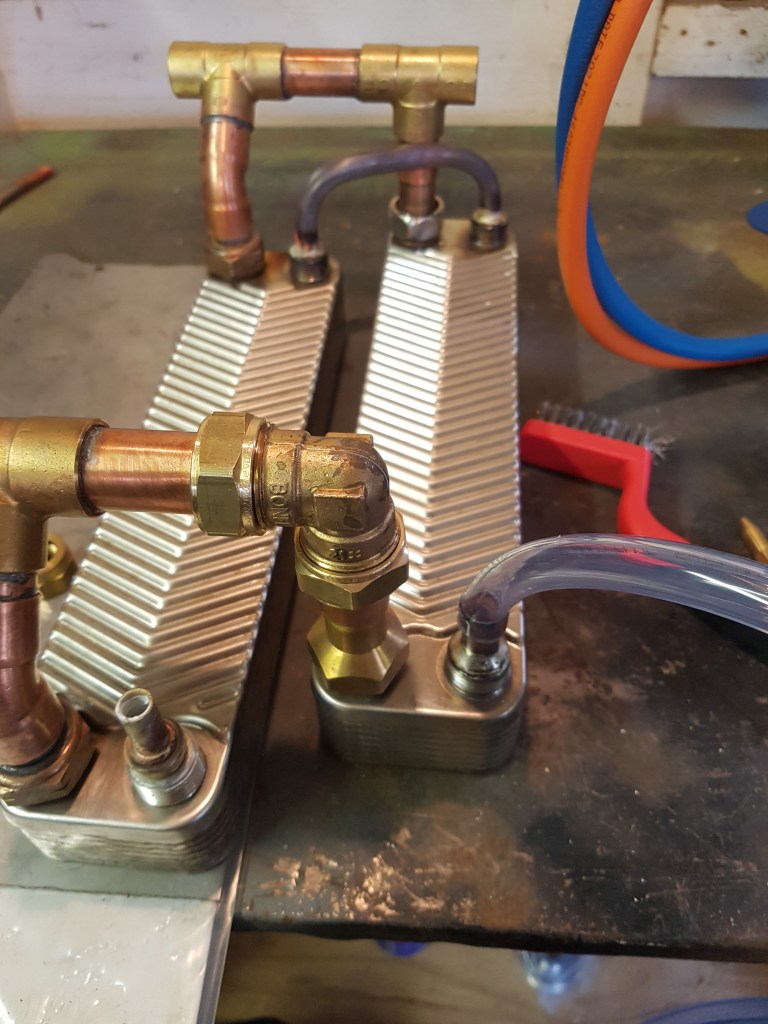
Note that the standard plate heat exchangers do not have such a large in- and output diameter, that is why I have used two heat exchangers in parallel on the water side (mounted in series on the refrigerant side). Note that this is not a requirement (it is also possible to install one bigger plate exchanger), but it does make it easier for the pump to circulate the water at large throughputs. I have no experience with this, but it might be worth installing a water vessel to buffer temperature variations from the heat pump, to prevent strong oscillations and thermal stresses in the floor.
After connecting the refrigerant tubing to the outdoor unit, I have pressure-tested the system using pure nitrogen of up to 40 bar. In my opinion, it is not very important that this is pure nitrogen, in retrospect dry air would also have sufficed, and I am planning to build a pump from two old compressors (double pressure stage) to perform this test without using pressurized nitrogen from the bottle in the future. Use a leak checker (either soapy water or a dedicated microphone) to check for leaks.
After the pressure leak test, I was ready to pump a vacuum in the line. Be sure to pump long enough, ideally one should reach 400-300 microns or 0.5-0.4 mbar. The cleaner and dryer the line, the higher the performance of the unit. If you are not sure about possible water or other contaminations existing in the plate heat exchanger, it is a possibility to heat up the plate exchanger (e.g. with a heat gun) to evaporate those contaminations from the inner surfaces while pumping the line.
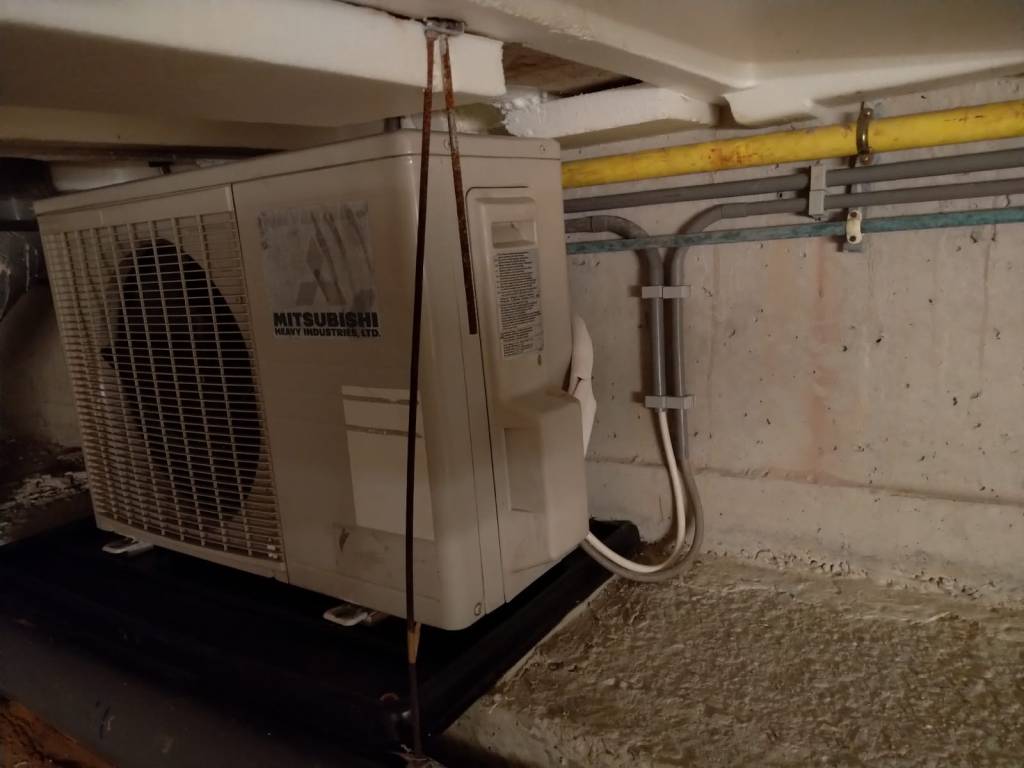
I have installed the outdoor unit in my underfloor space, this room will consequently be cooled. I will therefore install extra ventilation ports in the basement. It is of course not a problem to mount the outdoor unit outside of the house, this was simply not really an option in my case. Keep in mind that the outdoor unit will also condense quite some water, so a way to channel that water to e.g. the sewage would prevent moist issues later on.
The flowrate of the Grundfos pump (Alpha2 25-60 180) is easily adjustable, and I found that a flow of 0.4 m3/hr is sufficient in my case (about 35 m2 floor surface area). Do not forget to install an expansion vessel in the water circuit, for the temperature changes in the floor will cause the water to expand or shrink slightly.
First operation of the heat pump
Be sure to circulate water at the plate exchanger, such that the heat (or lack thereof when cooling) can be transported away when you are running the AC. I made the mistake of turning on the AC without circulating the water, with the result that the plate exchanger (with water inside) had cooled down to -32 degrees. I am very lucky that the exchanger did not break due to freezing expansion!
The installation manual of the AC you are installing should inform you about the refrigerant pressures during operation. I made sure that the refrigerant was filled up sufficiently in the following way:
- I connected the manifold to the service valve (only available at the gas port in this model)
- Turned on the AC in cooling mode, so that the pressure at the gas port (and service port) is lowest. This makes it easier to top up the refrigerant.
- As the pressure decreases, you can more easily add more refrigerant. Be careful and slowly allow refrigerant to flow in (if it enters the compressor in liquid form, it might damage it). In my case, I had no access to bottled refrigerant, so I bought two small mobile ACs, which I emptied at the high pressure side while running their compressors. According to the installation manual, the pressure at the gasline in steady operation was recommended to be kept at 9-11 bar.
Calculating the coefficient of performance (COP)
The efficiency of the heat pump depends on many factors: The air temperature and humidity at the outdoor unit, the temperature difference at the plate heat exchangers, the flow resistance, and many other factors. I have estimated it using the following data:
- The temperature difference (dT) between the ingoing and outgoing water flow (typically 3 degrees).
- The water flow rate (Q, typically 0.4 m3/hr)
- The instantaneous delivered plug power (P, typically 200-300 Watt)
The COP is then calculated as follows:
COP = Outgoing heat rate (Thermal) / Incoming heat rate (electric) = dT*Q*Cv/P
With Cv being the Specific heat capacity, about 4.2 ⋅106 ⋅ J⋅m−3⋅K−1 for water. In a quick estimation, my system seemed to perform at around a COP of 4 (outside temperature of about 10 oC, inside around 25 oC), at first glance a very competitive performance.
Advise in selecting the right AC unit
- Select a reputable brand: In the Netherlands, there are many small AC brands available that might be more difficult to find spare parts for. I would recommend to focus on brands that have been producing AC units since a long time, which hopefully makes the finding of spare parts easier in the future. Some examples are Mitsubishi, Panasonic, LG, and Daikin.
- Think about the refrigerant filling before you buy the AC. In my case, the previous owner of the AC unit stored all the refrigerant in the outdoor unit. Here (LINK) you can see a demonstration on how to do that yourself. This is very important to keep in mind: If there is no refrigerant in your AC, you will have to find refrigerant yourself; in the EU, you are only allowed to work with refrigerant if you have a license. Be aware that it is quite likely that you need more refrigerant than before, when the air heat exchanger was used, because of the difference in volume, so be prepared to require extra coolant.
- Make sure that the AC unit can both heat and cool. Technically speaking, this means that the outdoor unit must contain a ‘four-way valve’ that can switch between cooling and heating operation, and must have a de-frost option. Most modern ACs do have this option, I believe that the keyword ‘Inverter’ is used to market this option in an AC.
- Make sure that the plate heat exchanger can stand up to 40 bar fluid pressure. Not all heat exchangers are designed to stand such high pressures. Make sure the size of the heat exchanger matches the need for your house. This is hard to estimate, in the end I have used two available heat exchangers in series, which turned out to be
- Don’t depend your decision too much on marketed COP values: This value will certainly change. Additionally, your AC’s performance depends partially on the heat excanger of the indoor unit. As a guideline, a marketed COP around 4 should lead to good performance.
- Preferably use modern refrigerants, such as R410a and R32. These often perform better and do not affect the ozone layer. I would therefore not recommend using R22 refrigerant.

Leave a comment